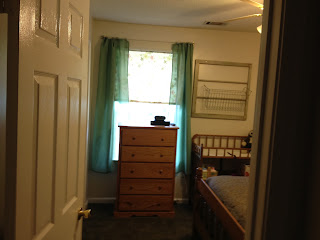
This room is a room currently being shared by a mom and her beautiful son. She will spend 3 months after she has her baby in this room as well. We broke the room up into sections for each need.
This changing table has shelves below, and we added a basket connected to a window above to add storage for diapers and wipes.
The closet serves as a place to showcase school work, as well as a clothes storage and belt holder for the youngster.
The plate rack works great as a belt/shoe holder... it is slim and takes up very little space.
Behind the door was the best fit for the book holder made from a pallet. It is the perfect height and he enjoys taking the books into his reading nook in the closet. The window was converted to a bag/tie/bookbag/diaper bag holder. It is easy to grab what you need as you are walking out the door.
The corner is reserved for the baby's bassinet.
The window was fitted with odds and ends picked up at the local Re-Store and painted to coordinate. Above is door stops which serves as hooks and below is an example of a door handle that also makes a great hook for larger items.
The basket was rescued from Re-Store and I love the galvanized metal look. It is also airy and does not block the views as your eye travels around the room.
The trash can was also a rescue...it was black inside and out... we painted it white and green and then used a brown stain to tone down the colors.
Love the curtain solution...thick gauge wire was used to hang the curtains (which is actually a fabric shower curtain and it had the grommets already installed).
Of all the solutions, we loved the bed risers the most. It allows the mom to get in and out of bed more easily and it tripled the storage in the room.
Tuesday, July 17, 2012
Friday, July 6, 2012
Greenhouse from Old Windows
This is one of the easiest projects I've completed. Anyone can do this!! Go to the closest ReStore and bring home as many windows as you can find. Use L-brackets to connect them and then small 2 inch hinges to attach the top two windows. My basil just might make it through this winter :-)
Dining Room Bench made from Headboard/Footboard
One of my summer projects. Although this bench currently sits on the front porch (until the stain cures), it will move indoors to its final home in our dining room...just to add a little color to the space. I started with a headboard and footboard (thank you ReStore!) and went from there.
The footboard was cut in half but I decided this was too deep for a seat, so I trimmed about four inches off each piece. The footboard pieces are attached to the headboard with pocket screws. I added 1x4's across the front and back and then more 1x4's as cross braces connected to each front and back piece.
The top piece (where you actually sit) is a piece of mdf from ReStore.
The paint: one coat of primer, one coat of red, distress corners, apply and wipe off ebony stain
Loved making this piece and will def do it again. One the hunt for more willing headboard/footboard combos!
Subscribe to:
Posts (Atom)


.JPG)
.JPG)
