So, you can't see my pictures unless you are logged into my account. crazy I know!!
new to this blogging thing....seems there are many kinks to work out...
Saturday, February 26, 2011
Wednesday, February 23, 2011
Tile goes up...
Cutting around the individual tiles was not my job :-) thank goodness!!
Did I mention we didn't cook for a week!
But the work is starting to pay off!
A work STILL in progress....JK! it really didn't take that long after the work began :-)
Not finished yet, but getting there.
I would have to say that the tile looks great with the granite!
Top to Bottom
Navigating the kitchen became a game :-)
And then....we started the tile installation....
Kitchen Re-do From Top (new lights) to Bottom (new floors)
The only light in this room when we moved in was the previous light that would be where the hole in the ceiling is now.
I can't decide if I want to add another can light, or fill in the hole :-)
Island Construction is finished :-)

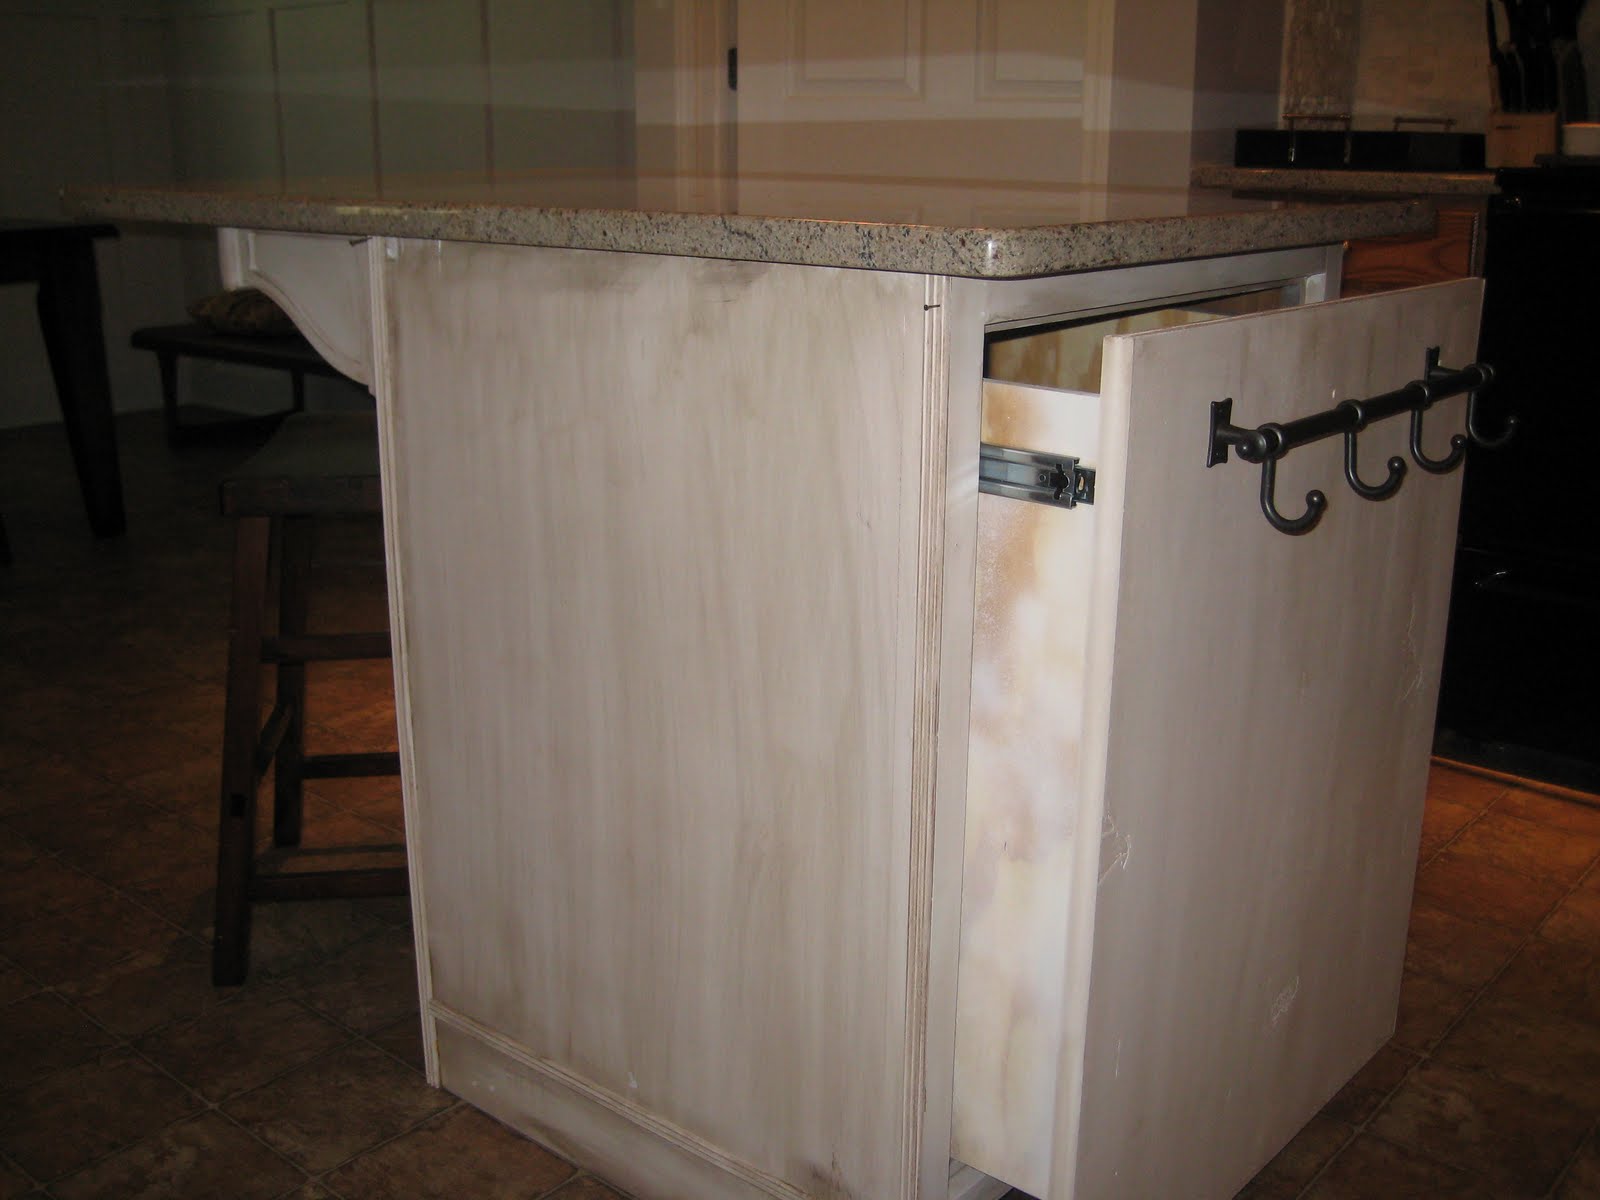

In the previous posts you can see this started out as a $25 bathroom cabinet which we added a base, pull out garbage bin and a granite counter.
Painting:
1. Primed using Kilz.
2. Painted using the lightest of gray.
3. Used low grade sandpaper to rough up the edges.
4. Wiped the entire piece down with walnut stain and then wiped off again.
I do like it! I will love it better when I install the mocha floor.
I would love to add the trim this week, but going out of town...I may try it...
Monday, February 14, 2011
primes and ready for paint...
Today was a good day! I used spray primer because that is what I had in the garage and then did a light sanding . I know I want to add more trim work...this is how I roll...
i


i
Sunday, February 13, 2011
A very productive day...
Today was a busy and wonderfully productive day for everyone at my house! Tutoring this morning, early....then straight to church which was my first visit and I may go back :-).... primed the island base and added the trim... helped my room mate scrapbook pages for her niece... it's all good in Senoia!
Pictures will be up soon, running into technical problems :-)
Pictures will be up soon, running into technical problems :-)
Island Construction
Are we done yet? primer is going on today, yay! when friends come over it somehow forces you to get a move on things :-)
new ideas for the dining room area, putting up wainscoting and a preacher's rail...paint should be here this week. time to paint! yeay!
new ideas for the dining room area, putting up wainscoting and a preacher's rail...paint should be here this week. time to paint! yeay!
Wednesday, February 9, 2011
Ok, so the island is not finished.
My first piece of furniture....it is working out to be a learning experience. The finished product will look great! Yes it will!
Sunday, February 6, 2011
Island Construction
Brought the work inside...
Yay for have an understanding room-mate! She doesn't care if I work on the island project in the dining room.
It is almost complete...just need one more piece of trim, which requires one more trip to the now familiar Lowe's...and the construction will be complete...next comes the paint...
still trying to decide on the paint color...cabinets will be dark so I need to go a little lighter... I may be able to sand and prime today if the rain will move on over toward the Atlantic. really need to be taking pics. so will work on that today.
have a nice day peeps.
Saturday, February 5, 2011
Island still under construction...
Rain, Rain Go Away :-) I've been in the garage as much as possible working on the island base but it is still there...waiting to be placed in it's new home.
The base kick plate has been added. I am learning the type of builder I am...and it seems I am the fluid model :-) I have no problem changing the design as I go along. So, I see a design that will work better than my idea, and what do ya know, it is now my design. Hmm.
How do we make a square box...it sounds easy, but my friends it is very tricky :-)
The idea is to make a box to attach to the front door as a pull out for the extra large trash can in the island base. After having the wonderful lady at Lowe's to cut the 3/4 and 1/2 inch plywood into the right dimensions, I brought the 4 pieces of wood home to build the box. Easy, just screw them together....well after cuttin, unscrewing, screwing again...I decided to take the back piece out and replace with slats.
Not perfect, but I'm happy to say it rolls in and out of the island and will be a beautiful garbage can.
Now today I will tackle the corbels...no, I didn't know what a corbel was either until I started this project. lol
Because the island will be topped with granite with an 18 inch overhang, I need some support and the corbel is just the thing to help. Today I will drill a pilot hole and attach to the base using very large bolts...well they may be a little too big, but it's better to be safe than sorry I say!
Have fun today my friends!
Subscribe to:
Posts (Atom)